Docker-Compose Project
Docker Compose
Docker Compose is a tool that was developed to help define and share multi-container applications.
With Compose, we can create a YAML file to define the services and with a single command, can spin everything up or tear it all down.
Learn more about docker-compose visit here
What is YAML?
YAML is a data serialization language that is often used for writing configuration files. Depending on whom you ask, YAML stands for yet another markup language or YAML ain’t markup language (a recursive acronym), which emphasizes that YAML is for data, not documents.
YAML is a popular programming language because it is human-readable and easy to understand.
YAML files use a .yml or .yaml extension.
Task-1
Learn how to use the docker-compose.yml file, to set up the environment, configure the services and links between different containers, and also to use environment variables in the docker-compose.yml file.
What is Docker-Compose?
Docker Compose is a tool for defining and running multi-container Docker applications. It allows you to define your application as a set of services, each with its own container, and specify how these containers should interact with each other.

With Docker Compose, you can define your application’s infrastructure, including databases, message queues, and web servers, in a simple YAML file.
Docker Compose provides a simple way to orchestrate and manage the containers that make up your application, allowing you to start and stop them together, scale them up and down as needed, and manage their network connections.
This makes it easier to develop, test, and deploy complex applications that consist of multiple services.
Step 1: Installing Docker-Compose in the server
How to Install Docker Compose on Linux Systems
https://docs.docker.com/compose/install/#install-compose $ sudo curl -L…

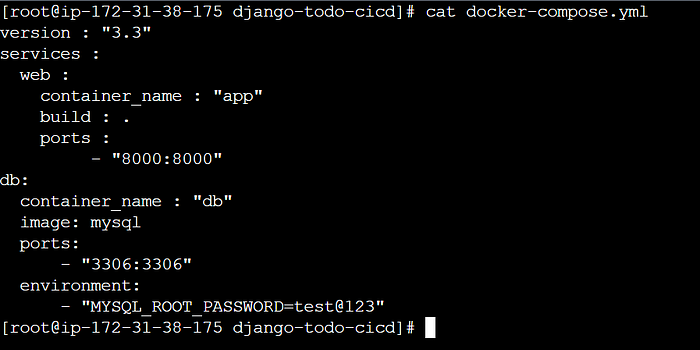
Step 2 : Create a docker-compose.yml file

So now we will see what all are the things written in the docker-compose file.
version: 3.3 denotes that we are using version 3.3 of Docker Compose.
The service informs us about the various containers the compose file is going to create in this case two will be created as we have two services : web and database.
The build specifies the location of the Dockerfile, and . represents the directory where the docker-compose.yml file is present.
The image keyword is used to specify the image from docker hub for MYSQL containers
For both the services we are using different ports and using port keyword to mention the ports that need to expose for those services.
And then, we also specify the environment variables for mysql which are required to run mysql.
Step 3 : Running docker-compose.yml file
The docker-compose up command is used to start up a set of containers defined in a Docker Compose file.
By default, docker-compose up starts containers in the foreground and logs their output to the console. You can use the -d flag to start the containers in detached mode, which runs them in the background.
The docker-compose ps command is used to display the status of containers defined in a Docker Compose file.
Step 4 : Verify that application is working on web browser
Task-2
- Pull a pre-existing Docker image from a public repository (e.g. Docker Hub) and run it on your local machine. Make sure you reboot instance after giving permission to user.

- Run the container as a non-root user (Hint- Use
usermodcommand to give user permission to docker).

- Then reboot instance after giving permission to user.

- Inspect the container’s running processes and exposed ports using the docker inspect command.
docker inspect <container_name or ID>
- Use the docker logs command to view the container’s log output.
docker logs <container_name or ID>
- Use the docker stop and docker start commands to stop and start the container.
docker stop <container-name or ID>
- Use the docker rm command to remove the container when you’re done.
docker start <container-name or ID>
Example of project..
yamlCopy codeversion: '3'

services:
  web:
    image: nginx:latest
    ports:
      - 80:80
    volumes:
      - ./html:/usr/share/nginx/html

  db:
    image: mysql:latest
    environment:
      - MYSQL_ROOT_PASSWORD=secret
      - MYSQL_DATABASE=myapp
      - MYSQL_USER=myuser
      - MYSQL_PASSWORD=mypassword
    volumes:
      - ./data:/var/lib/mysql
In this project, we have two services: web and db. The web service is using the official Nginx Docker image and exposes port 80 on the host, forwarding it to port 80 in the container. The web server's document root is mounted as a volume, allowing you to make changes to the HTML content by modifying the files in the ./html directory on the host.
The db service uses the official MySQL Docker image. It sets up environment variables for the root password, database name, username, and password. The MySQL data directory is mounted as a volume, ensuring that the database's data persists even if the container is restarted or recreated.
To use this Docker-Compose project, you would save the above YAML configuration to a file named docker-compose.yml and run the following command in the same directory:
Copy codedocker-compose up
This will download the necessary Docker images (if not already available) and start the containers for the web server and database. You can then access the web application by opening a web browser and navigating to http://localhost.
Feel free to customize this project by adding more services, specifying additional configuration options, or incorporating other technologies based on your specific needs.
2nd project..
yamlCopy codeversion: '3'

services:
  frontend:
    build:
      context: ./frontend
    ports:
      - 80:80
    depends_on:
      - backend

  backend:
    build:
      context: ./backend
    ports:
      - 8080:8080
    depends_on:
      - database

  database:
    image: mysql:latest
    environment:
      - MYSQL_ROOT_PASSWORD=secret
      - MYSQL_DATABASE=myapp
      - MYSQL_USER=myuser
      - MYSQL_PASSWORD=mypassword
    volumes:
      - ./data:/var/lib/mysql
In this project, we have three services: frontend, backend, and database. Each service is defined with its own configuration and dependencies.
The frontend service builds the frontend application using a Dockerfile located in the ./frontend directory. It exposes port 80 on the host, forwarding it to port 80 in the container. This service depends on the backend service, meaning that the backend service will be started before the frontend service.
The backend service builds the backend application using a Dockerfile located in the ./backend directory. It exposes port 8080 on the host, forwarding it to port 8080 in the container. Similar to the frontend service, the backend service depends on the database service.
The database service uses the official MySQL Docker image. It sets up environment variables for the root password, database name, username, and password. The MySQL data directory is mounted as a volume for data persistence.
To use this Docker-Compose project, you would save the above YAML configuration to a file named docker-compose.yml and create the Dockerfile files for the frontend and backend applications in their respective directories. Then, you can run the following command in the same directory:
Copy codedocker-compose up
This will build the necessary Docker images (if not already built) and start the containers for the frontend, backend, and database services. You can then access the frontend application by opening a web browser and navigating to http://localhost.
Feel free to extend this project by adding more services, configuring networking, or incorporating additional components as per your project requirements.